

5 Engaging DIY Projects to Kickstart Your Summer (Using Real Tools!)
In today's digital age, many parents are actively seeking ways to reduce their children's screen time. A recent study highlights that two-thirds of parents fear screen time is stealing meaningful moments, with 41% worrying their children's entire childhoods are being lost to technology . This shift towards screen-free activities is driven by concerns over behavioral issues linked to excessive screen use, such as irritability, mood swings, and reduced attention spans.
To support this movement, we've compiled five engaging DIY projects that utilize simple tools like a kids' hammer and children's tape measure. These hands-on activities are designed to teach measurement, coordination, and problem-solving skills, offering a constructive and enjoyable alternative to screen time.
At the heart of these projects is our belief that early exposure to practical skills boosts confidence and cognitive development. The simple act of using a kids hammer to build or a children's tape measure to calculate dimensions helps young minds understand spatial relationships and cause-effect principles.
Each project is designed to:
- Develop hand-eye coordination (using a kids hammer safely)
- Teach practical math (through a children's tape measure)
- Encourage creative problem-solving
Let’s dive in for a delightful summer filled with laughter, learning and growing!
Project 1: Birdhouse
A birdhouse is a great starter project, it’s simple, functional, and lets kids see their work come to life outdoors. All you need are a few materials, some patience, and the right tools to get going.

Tools needed
- Kids hammer
- Sandpaper
- Wood pieces or a beginner-friendly kit
- Children’s tape measure
Steps:
- Help your child lightly sand the wood pieces to remove any rough edges.
- Use a children’s tape measure to mark nail spots. This introduces basic spacing and alignment.
- Let them start hammering the nails with a kids hammer, using gentle, guided taps to build control.
- Assist with any tricky angles or reinforcement.
- Once assembled, decorate the birdhouse and find a sunny outdoor spot to mount it.
You don’t need to search the whole internet for the perfect kid-friendly toolkit or buy a dozen different items. In fact, you don’t need that many tools at all. A starter set like HandyFamm’s 3-in-1 tool is often enough to spark interest. As your child builds confidence, you can slowly introduce more tools based on what they enjoy using most.
Project 2: Picture Frame
This DIY picture frame is a quick, mess-free way to get kids building something personal. It’s a creative craft that introduces precision and basic measurement, all with minimal materials.

Tools & supplies:
- Children’s tape measure
- Popsicle sticks
- Craft glue
- Cardboard backing
- Markers, stickers, or paint for decorating
Steps:
- Have your child decide the frame’s dimensions (e.g., 4x6 inches) using a children’s tape measure.
- Help them lay out popsicle sticks and measure for equal-length sides using the toy tape measure for fun, hands-on practice.
- Glue the sticks together at the corners, forming a rectangle or square.
- Attach a cardboard backing, leaving the top open for the photo.
- Let your child decorate the frame however they’d like, add names, dates, or colors to personalize it.
Kids love seeing their artwork turned into something display-worthy. The act of measuring and aligning pieces helps them connect numbers to real outcomes.
Project 3: DIY Toolbox
As kids get more comfortable with tools, they’ll need a place to keep them organized. Building a simple wooden kids toolbox is a great next step. It adds a sense of responsibility, encourages tool care, and gives them ownership of their gear.

Tools & supplies:
- Wood panels (lightweight pine or plywood)
- Wood glue
- Kids hammer
- Small nails or screws
- Handle ( wooden dowel or rope)
Steps:
- Pre-cut the base, two long sides, and two shorter end pieces. For added ease, you can buy a pre-sized set at a craft store.
- Help your child apply wood glue to the edges and attach the sides to the base. Hold for a minute to set.
- Once dry enough to hold shape, assist with reinforcing the joins using a kids hammer and small nails.
- Add the handle by securing it between the two shorter sides, this gives them a true “grab-and-go” tool feel.
- Let them paint or decorate their kids toolbox however they want, this is their space, after all.
Store DIY toys for 10 year old builders in their handmade toolbox! From tape measures to kid-sized hammers, having a go-to spot for their tools builds a habit of putting things away and treating gear with care.
Project 4: Marshmallow Catapult
This build is equal parts fun and educational. Kids can explore basic physics while building something launch-ready with just a few simple materials. It’s a great way to encourage collaboration and creative problem-solving.
Tools & supplies:
- PVC pipes and elbow joints
- Rubber bands
- Plastic spoon or mini cup (for launcher)
- Marshmallows
- Children’s tape measure
- HandyFamm Safety Goggles
Steps:
1. Lay out the PVC pipes and build a triangle or square base using the elbow joints.
2. Measure launch bases with a toy tape measure for STEM learning. This helps kids understand spacing and balance.
3. Secure the launching arm (a spoon or cup) to the frame using rubber bands.
4. Use the children’s tape measure again to test different launch distances and adjust the angle for better results.
5. Put on safety gear especially HandyFamm’s Safety Goggles before testing launches. Make a game of it by setting up targets!
Encourage your child to record what changes impact launch distance. This builds real-world experimentation habits and introduces variables like angle, tension, and force.
Want to dive deeper into what skills they're learning here? Check out our blog: 5 STEM Skills Kids Learn With a Kids Tape Measure.
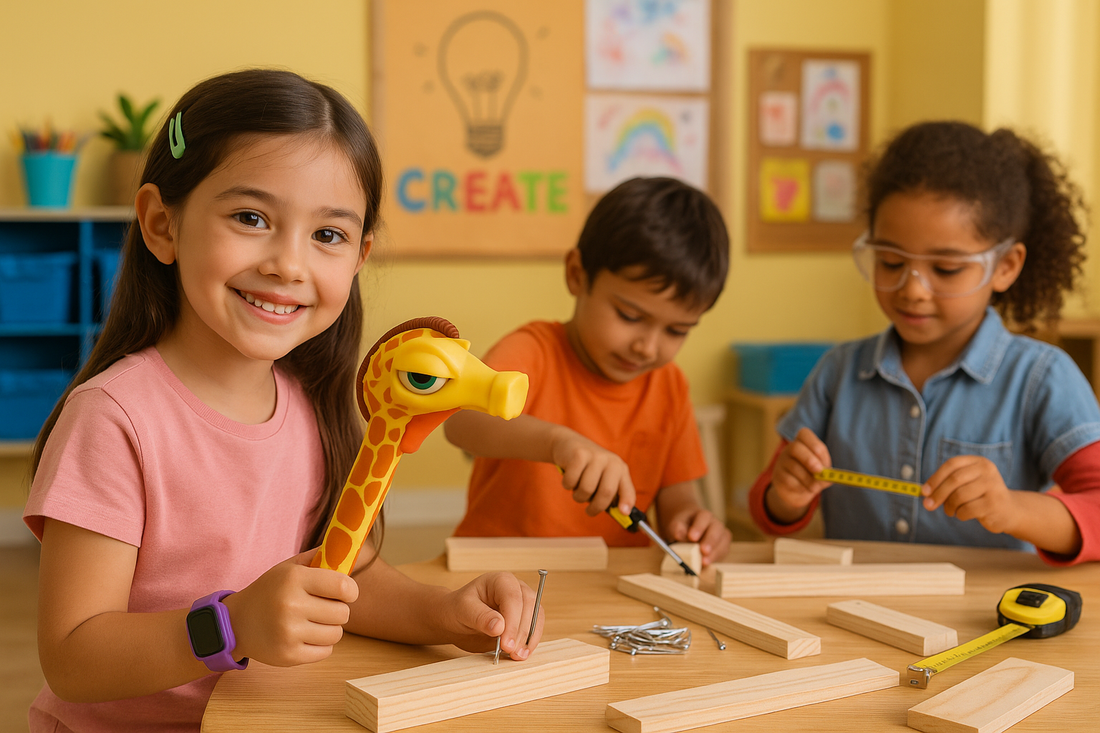
Project 5: Wooden Racecar
This project combines creative design with basic construction, making it one of the most engaging DIY toys for 10 year old engineers. Kids get to build, test, and redesign as they go, just like real makers.

Tools & supplies:
- Pre-cut wood pieces (or a simple kit)
- Wooden wheels and axles
- Craft glue
- Sandpaper
- Kids hammer
- HandyFamm Stretch Giraffe Hammer
Steps:
- Sand all wooden parts to ensure smooth edges.
- Begin by assembling the base and body of the car with glue and nails.
- Help your child drive in the nails using a kids hammer, showing them how to keep a steady hand.
- Attach wheels and axles. Use the kids hammer again for light taps to lock them into place.
- Paint and personalize the racecar before test-driving it across the floor or sidewalk.
If you're looking for a kid-friendly hammer that actually fits small hands, the HandyFamm Stretch Giraffe Hammer is a good place to start. It's functional, sized right, and gets them excited about building.
Conclusion
From birdhouses to racecars, these projects need just a kids hammer and children’s tape measure to start. They are simple to set up, engaging to build, and packed with opportunities for hands-on learning. Whether your child is measuring for a marshmallow launcher or assembling their own toolbox, each activity builds useful skills without needing screens to stay interested.
Looking for an all-in-one tool that keeps things simple? The HandyFamm 4-in-1 Fido Dog Tape Measure combines measuring, marking, leveling, and fun in a kid-friendly design, great for building early confidence.
Perfect for parents looking for DIY toys for 10 year old makers, HandyFamm’s tools are more than just play. They help kids gain real-world skills through hands-on, age-appropriate projects.
Safe Tools, Smart Fun, Happy Builders


 https://handyfamm.com